This page was machine-translated from Portuguese and may contain mistakes. Read the original
What is BDD
BDD is an English term: "Behavior-Driven Development"; in Portuguese, it is equivalent to "Desenvolvimento Orientado por Comportamento" or "Desenvolvimento Orientado a Comportamento."
It is a technique used in software development whose main goal is to bring technical and non-technical teams closer together through a language called “Gherkin,” in which a system’s behaviors are described using “Given-When-Then,” which translates to: "Given-When-Then" (with the addition of the words "And" and "But").
In practice, the description of system requirements would look something like this for a login screen:
Given the customer is on the sign-in page
When the <email> and <password> are informed
And the "OK" button is hit
Then the dashboard page is displayed
Dado que o usuário está na tela de login
Quando o <email> e a <senha> são preenchidos
E o botão "OK" é acionado
Então a página de tarefas é exibidaAll system behaviors are described in a manner similar to the one listed above.
For test cases, there are ways to list which data can be used to fill in the <email> and <password> fields, known as “Scenario Outline,” which is basically a data table.
There are also ways to list “Background” or “Preconditions” when necessary.
In test automation, the framework that supports this technique is known as “Cucumber” (the Portuguese translation is “pepino,” but we still call it Cucumber—pronounced “quiu-câmber”). Cucumber translates the code between the Gherkin language and the project’s programming language.
When using this framework, it’s usually necessary to create at least:
- a file called a feature file containing the scenario descriptions, as we saw above;
- a file called a “step definition,” written in the programming language of your choice (TypeScript, Java, Python, etc.);
- a configuration file for the Cucumber framework;
- and other files (page objects, data files, hooks, etc.).
What is my opinion on BDD?
This technique has become very popular, and it’s common to find many companies using it in the field of test automation.
In my experience, most of these companies have lost sight of the main objective (which is to bridge the gap between technical and non-technical people), where ideally Product Managers/Business Analysts —Product Managers/Business Analysts—would write these rules to make them easier for clients to understand, and the other team members (development and test engineers) would reuse what was described for future work.
What happens in practice is that the way requirements are documented has evolved significantly in recent years. Some companies use Post-its (online), Excel, Jira, Confluence; others use Notion; still others use Figma, etc., so behavior-driven scenarios aren’t written, and test engineers end up being the only ones to use this technique.
As a result, in most cases, using BDD in automation does not add significant value to the project, creating the need to install yet another framework and implement yet another file.
One more framework and one more file are tasks we should avoid in projects whenever possible. Each framework requires the installation of yet another dependency that must be executed to run the tests. This adds execution time to your testing phase (and if configured incorrectly, it can also slow down the project’s deployment). As for creating yet another file, the same principle applies: it’s one more thing to maintain and more data to download when running an installation step in a pipeline, for example, resulting in more time.
We need to pay close attention to test execution time—both locally and in pipelines—and try to reduce it as much as possible.
It’s important to note that BDD has several advantages and several disadvantages. Just as deciding which framework to use for a project requires considering various factors, deciding whether to use BDD—and whether to continue using it—also requires weighing various factors.
Recently, I worked on a project where the team was having difficulty describing test scenarios for a complex part of the system that would be implemented using RTL—React Testing Library—which is used to test React components. The development team used the BDD writing pattern to assist with these tests. In this case, using BDD (partially) proved to be an excellent technique for solving this project challenge. I’ll share more details on how we handled this requirement in a smart and practical way later in this post, in the section “Alternatives to BDD in Playwright—BDD without Cucumber.”
How to Implement BDD with Cucumber Using Playwright
Check out my sample repository.
Cucumber does not have native support for TypeScript; you need to use JavaScript or a transpiler (translator) to JavaScript. Since we’ll be using TypeScript, we’ll use ts-node for this.
If your project already uses another transpiler (such as Babel), you won’t need to install and/or configure ts-node.
The steps below assume a project with no transpiler configured.
Another option would be to use playwright-bdd, which already has all the transpiler configuration set up. I chose not to use this framework so we can understand a bit about how everything works.
1. Installation
1.1. Install Playwright (with TypeScript): npm init playwright@latest

1.2. Install Cucumber: npm install -D @cucumber/cucumber

1.3. Install TypeScript: npm install -D typescript

1.4. Installing ts-node: npm install -D ts-node

Explanations:
- The -D parameter installs as
devDependencyin thepackage.json. This means that in a complete project, these dependencies will not be compiled to generate the project’s “executable.” Since we are running tests, there is no “executable” in this project, so these dependencies should remain in this section. - We need to install TypeScript and ts-node because they will transcompile TypeScript to JavaScript so that Cucumber can interpret the commands.
2. Configuration
2.1. Create the `tsconfig.json` file in the project root: `npx -p typescript tsc --init`
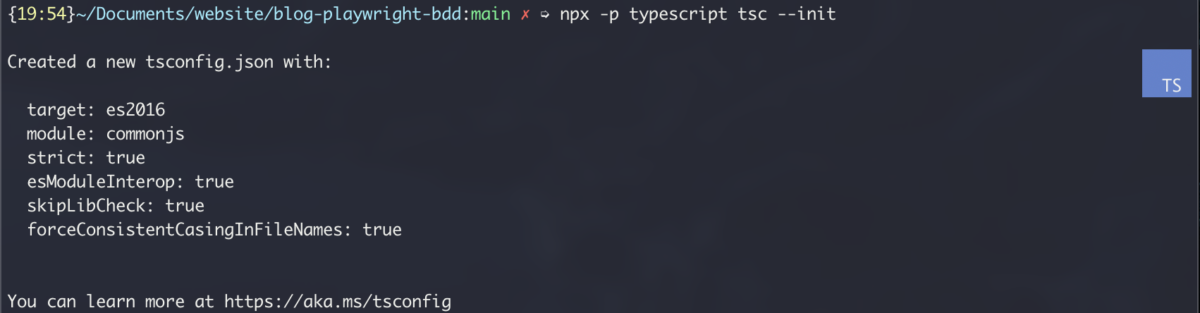
2.2. Open `tsconfig.json`
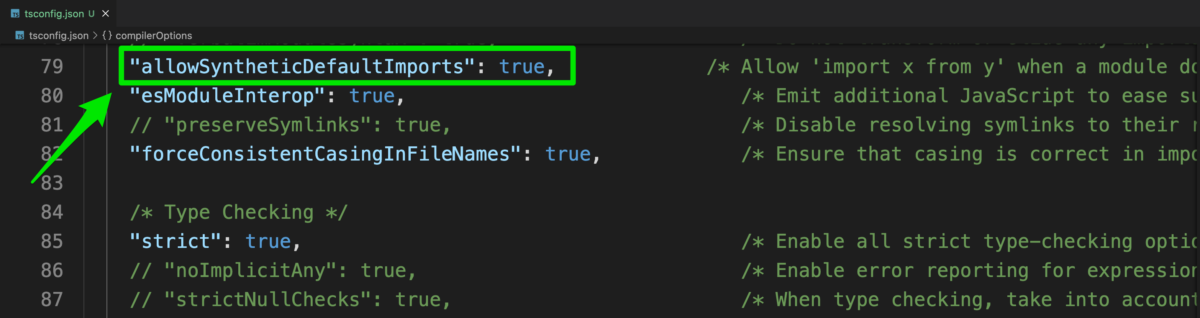
2.2.1. Remove the comment from `"allowSyntheticDefaultImports": true,`
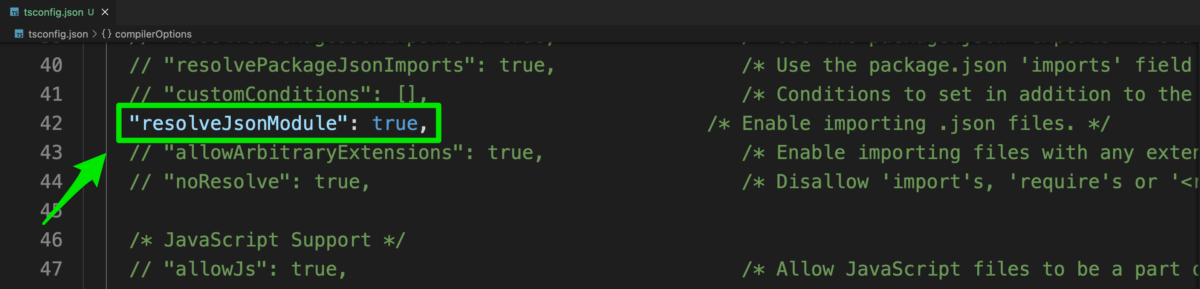
2.2.2. Remove the comment from `"resolveJsonModule": true,`
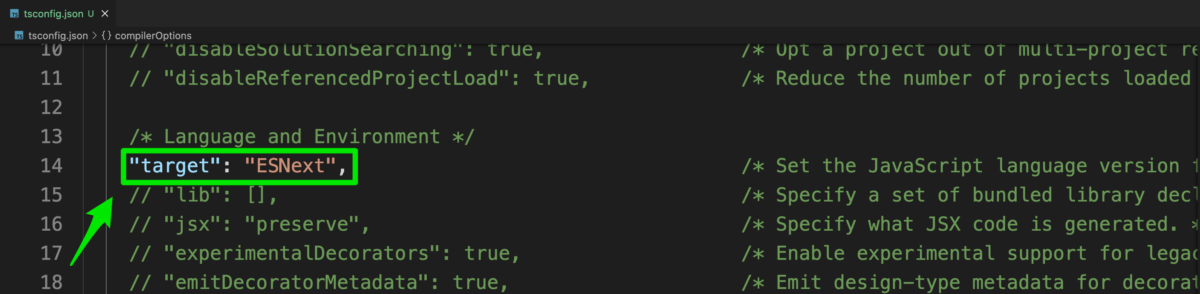
2.2.3. Set the target to "ESNext": "target": "ESNext",
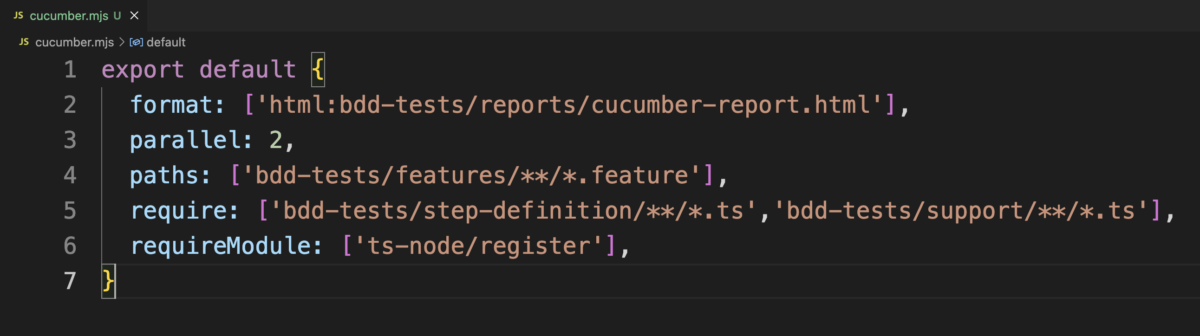
2.3. Create the file cucumber.mjs in the project root: create a new file manually
export default {
  format: ['html:bdd-tests/reports/cucumber-report.html'],
  parallel: 2,
  paths: ['bdd-tests/features/**/*.feature'],
  require: ['bdd-tests/step-definition/**/*.ts','bdd-tests/support/**/*.ts'],
  requireModule: ['ts-node/register'],
}
Explanations:
- In the
tsconfig.jsonfile, we configure the settings so that the compilation is performed correctly, since the syntax changes depending on which version of JavaScript you use. For more information, see here. - In the `
cucumber.mjs` file, we define the report format and where it will be saved, the number of parallel tests, the path to the feature files, the path to the step definition files and support files, and we require `ts-node` to be used during compilation. For more configuration options, see here. - The .mjs extension stands for “(M)odular (J)ava(S)cript.” It uses ECMAScript modules instead of CommonJS modules. The main difference is the use of `
import` and `export` (in ECMAScript) instead of `require` and `module.exports` (in CommonJS):
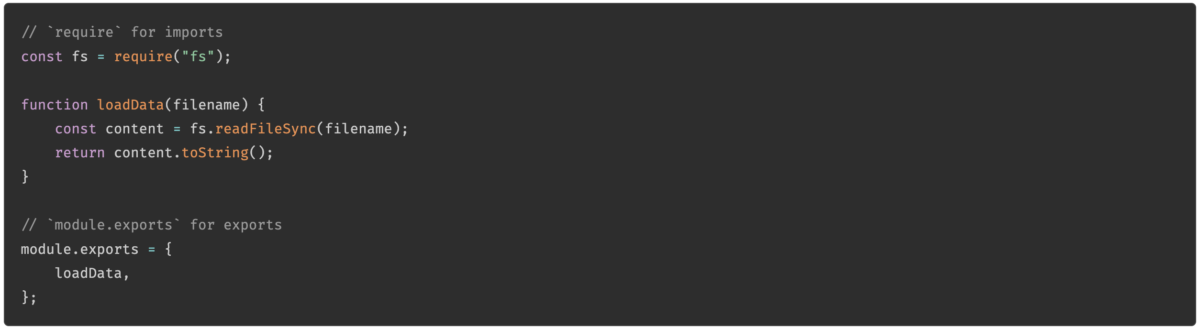

Source: https://codingforseo.com/blog/mjs-vs-cjs-files/
IMPORTANT: We haven’t even started creating the test files, and I’m already tired! lol
3. Implementing the test files
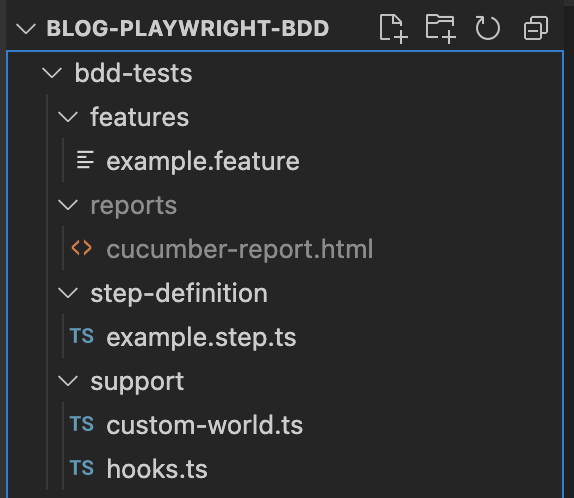
3.1. Create the feature file: /bdd-tests/features/example.feature
Feature: Playwright website

Scenario: Has Title
    Given I am at the playwright website
    # When I open the page
    Then the title has the text "Playwright"

Scenario: Get Started Link
    Given I am at the playwright website
    When I click at "Get Started"
    Then the URL has the text "intro"
The first scenario opens the Playwright page and checks if the title contains the word "Playwright."
The second scenario opens the Playwright page, clicks the "Get Started" button, and verifies that the URL contains the text "intro."
These are the same scenarios implemented in the /tests/example.spec.ts file, which is created when you install Playwright.
3.2. Create the file that integrates Playwright and Cucumber: /bdd-tests/support/custom-world.ts
import { setWorldConstructor, World, IWorldOptions } from '@cucumber/cucumber';
import { BrowserContext, Page, PlaywrightTestOptions } from '@playwright/test';

export interface CucumberWorldConstructorParams {
  parameters: { [key: string]: string };
}

export interface ICustomWorld extends World {
  context?: BrowserContext;
  page?: Page;
  playwrightOptions?: PlaywrightTestOptions;
}

export class CustomWorld extends World implements ICustomWorld {
  constructor(options: IWorldOptions) {
    super(options);
  }
}

setWorldConstructor(CustomWorld);
Cucumber uses the World class. This class has an isolated scope and exposes variables and methods for each step and hook through “this.” In other words, it allows for the reuse of variables and methods but uses a new instance for each test execution.
In this file, we are creating a `ICustomWorld` interface to be used in tests and to access Playwright’s `BrowserContext`, `Page`, and `PlaywrightTestOptions`, allowing us to interact with the browser and its elements.
3.3. Create the file that will start and close the browser: bdd-tests/support/hooks.ts
import { Before, After, BeforeAll, AfterAll } from '@cucumber/cucumber';
import { chromium, ChromiumBrowser } from '@playwright/test';
import { ICustomWorld } from './custom-world';

declare global {
    var browser: ChromiumBrowser;
}

BeforeAll(async function () {
    global.browser = await chromium.launch({
        headless: false,
    });
});

AfterAll(async function () {
    await global.browser.close();
});

Before(async function (this: ICustomWorld) {
    this.context = await global.browser.newContext();
    this.page = await this.context?.newPage();
});

After(async function (this: ICustomWorld) {
    await this.page?.close();
    await this.context?.close();
});
In this case, we’ll use only Chromium to simplify the example. But you can add any browser you want (as long as it’s supported by the frameworks). See the References at the end of the article for examples.
3.4. Create the step definition file: bdd-tests/step-definition/example.step.ts
import { Given, When, Then } from '@cucumber/cucumber';
import { expect } from '@playwright/test';
import { ICustomWorld } from '../support/custom-world';

Given('I am at the playwright website', async function (this: ICustomWorld) {
    await this.page!.goto('https://playwright.dev/');
});

When('I click at "Get Started"', async function (this: ICustomWorld) {
    await this.page!.getByRole('link', { name: 'Get started' }).click();
});

Then('the title has the text "Playwright"', async function (this: ICustomWorld) {
    await expect(this.page!).toHaveTitle(/Playwrights/);//this line is intentionally failing so we can see the reports
});

Then('the URL has the text "intro"', async function (this: ICustomWorld) {
    await expect(this.page!).toHaveURL(/.*intro/);
});
This file contains the actions to execute the tests and interact with the browser. It is very similar to the `tests/example.spec.ts` file. The step “the title has the text ‘Playwright’” was intentionally implemented to fail so that we can view the report.
We can see that we use “this: ICustomWorld” as a parameter for each step. This allows us to interact with the browser.
The ! symbol after this.page is called the “non-null assertion operator” and tells the type checker (in TypeScript) that this variable will never be null or undefined at any time, and that it should not flag any typing errors (since the type checker sometimes cannot identify them). Without it, an error will occur. Learn more here.
4. Running the Tests
Let’s run the tests using Cucumber. In your terminal, run:
npx cucumber-js
Since we configured the `bdd-tests/support/hooks.ts` file for `headless: false` mode, the browser will open while the tests are running. The result should be 1 test passing and 1 test failing. The `bdd-tests/reports/cucumber-report.html` file will be created, and when you open it, this is what you’ll see:
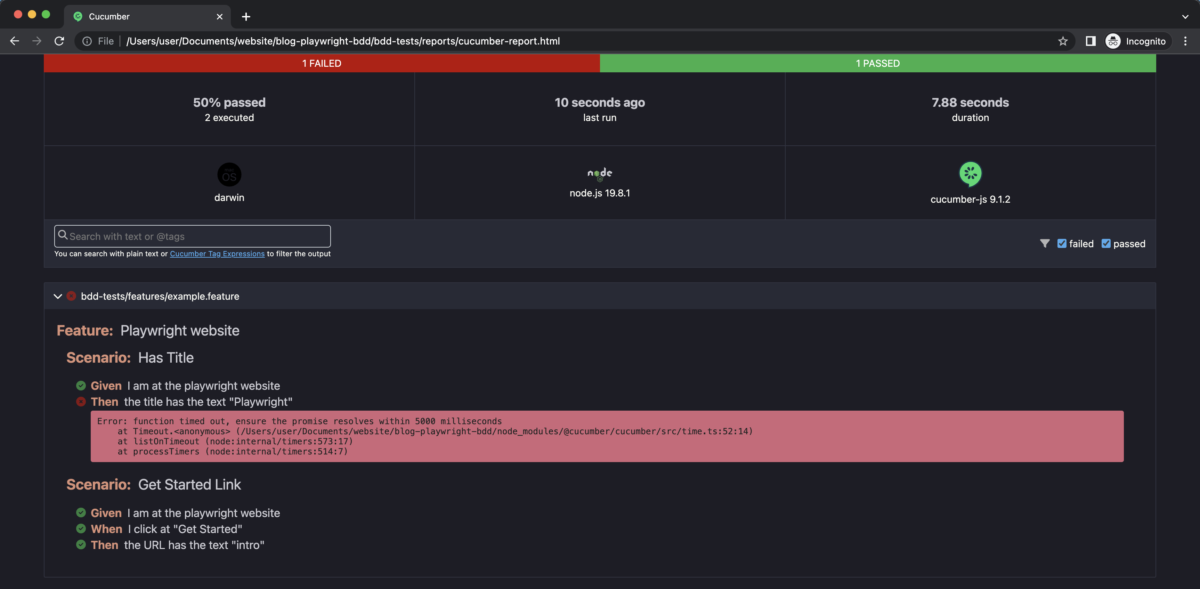
I won’t go into detail about the report since there are other, more comprehensive reporters available, but at least this one gives us access to the basics 🙂
The execution was very fast, and we can see that the step “Then the title has the text ‘Playwright’” failed, as expected.
I’ve included a more comprehensive example in the “Additional References” section, in case you’re interested.
Alternatives to BDD in Playwright—BDD Without Cucumber
BDD has several advantages, and the approach we’ve seen isn’t the only way to use it. If you and your team have decided that using BDD is necessary, here’s a simpler approach that requires fewer files: BDD in Playwright WITHOUT creating feature files.
In a project I worked on, the team realized that BDD would help with defining test scenarios and organizing tests. So we decided to use it for this specific need. Actually, it wasn’t even for testing with Playwright—it was for testing using RTL (React Testing Library). Since then, I’ve realized that we could do something similar with Playwright, and it might be useful for you as well.
1. Installation
Just installing Playwright is enough. Let’s install it the same way we did for Cucumber (if you’ve already completed this step, you don’t need to do it again):
npm init playwright@latest
2. Configuration
Open the file `playwright.config.ts` and change line 19 to “retries: 2,”.
It will look like this:

No other special configuration is required. Playwright already provides cross-browser support, parallel testing, and test reports.
3. Implementing the test files
Create a new `tests/example-bdd.spec.ts` file:
import { test, expect } from '@playwright/test';

test.describe('Feature: Playwright website', () => {
  test('Scenario: Has Title', async ({ page }) => {

    await test.step('Given I am at the playwright website', async () => {
      await page.goto('https://playwright.dev/');
    });

    await test.step('Then the title has the text "Playwright"', async () => {
            await expect(page).toHaveTitle(/Playwrights/); //this line is intentionally failing so we can see the reports
    });
  });

  test('Scenario: Get Started Link', async ({ page }) => {
    await test.step('Given I am at the playwright website', async () => {
      await page.goto('https://playwright.dev/');
    });

    await test.step('When I click at "Get Started"', async () => {
      await page.getByRole('link', { name: 'Get started' }).click();
    });

    await test.step('Then the URL has the text "intro"', async () => {
      await expect(page).toHaveURL(/.*intro/);
    });
  });

});
Explanation:
- We use `
test.describe` to name the Feature. This convention isn’t required in Playwright, but it’s quite useful. - We use `
test` to name the scenario. Playwright lets you name it however you like, so that’s fine. - We use `test.step` for the `
When` and `Then` events when necessary. This isn’t required either, but it can be used this way.
And that’s all that needs to be done (considering the same scenario implemented with Cucumber).
4. Running the Tests
To run the tests, we use Playwright itself. In your terminal, run:
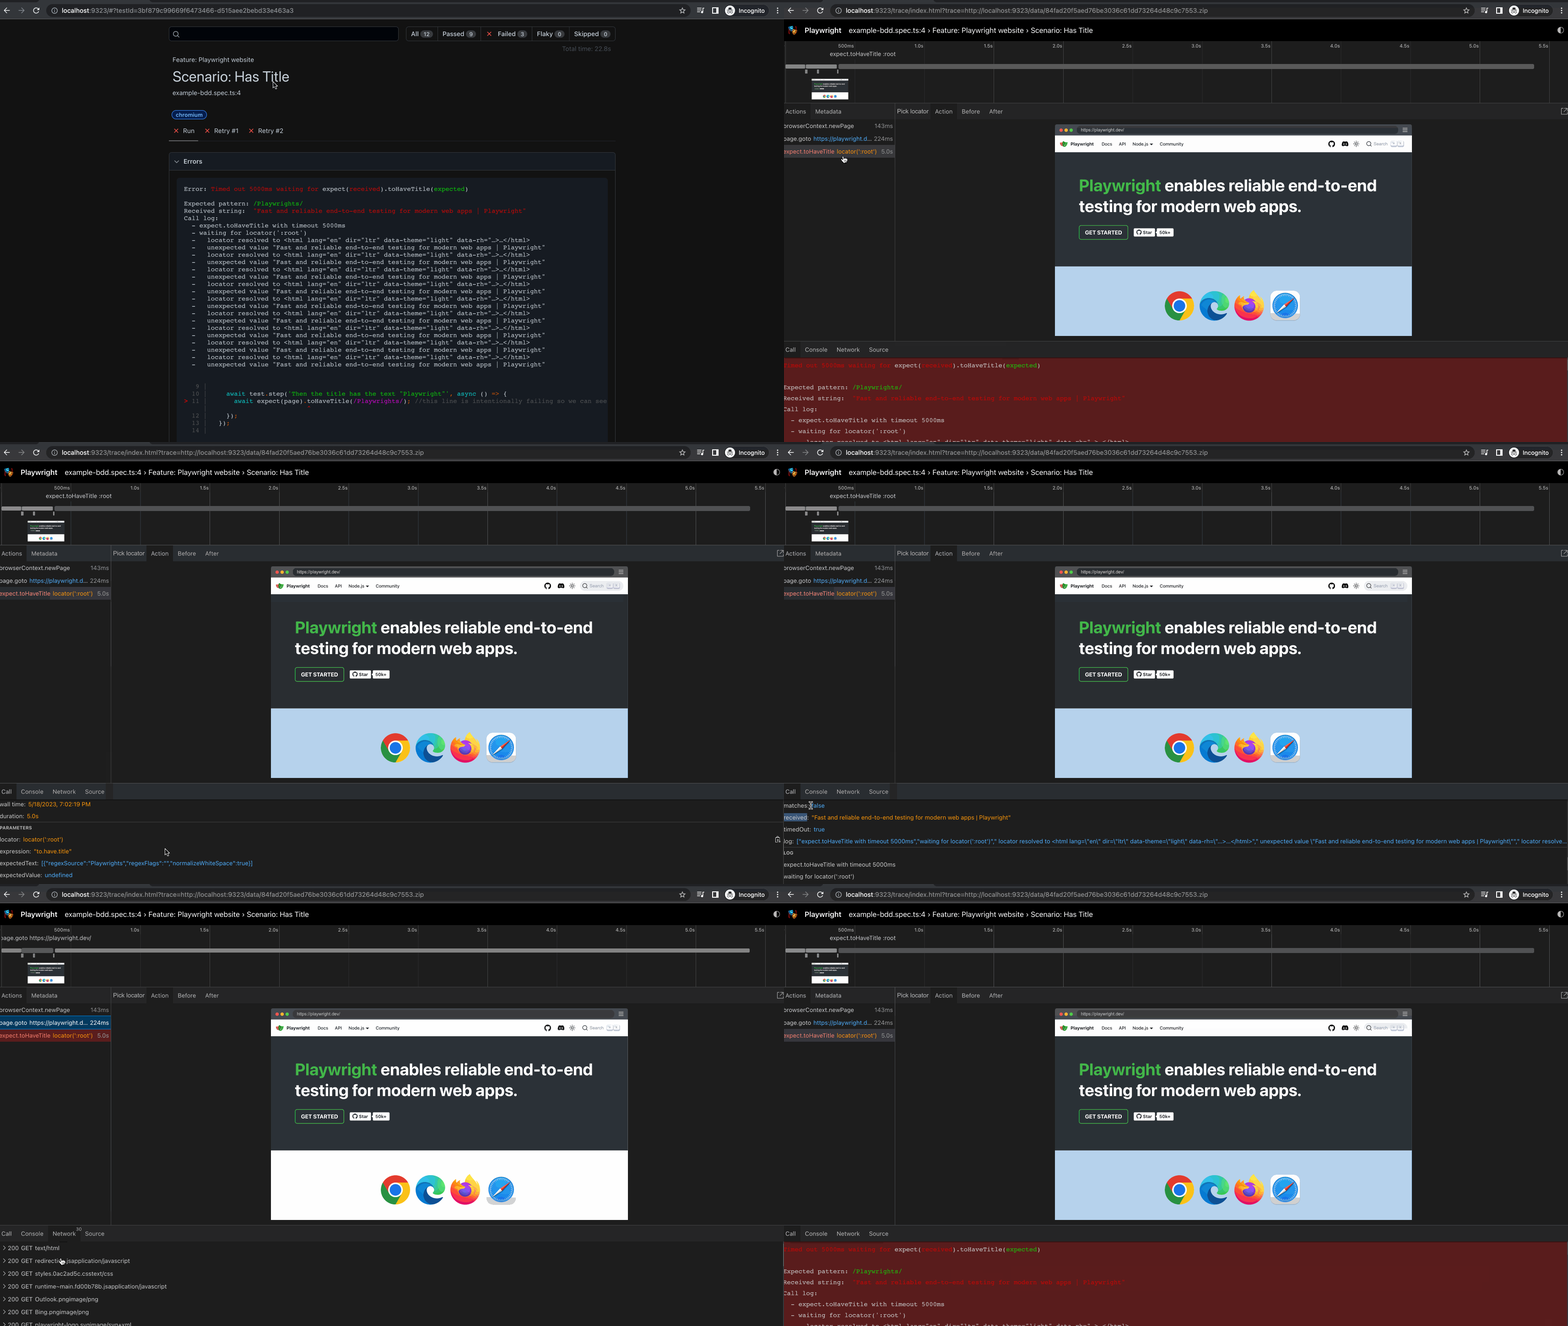
npx playwright testThe tests will run in headless mode across three browsers: Chromium, Firefox, and WebKit, which is Playwright’s default. It also comes with retry functionality, and the report will open automatically since one of the tests failed (intentionally). If you click on one of the failed tests, you’ll see a detailed comparison of the expected value versus the actual result; which line of code failed; and although there’s no screenshot (we could have added the line “screenshot: 'only-on-failure'",” to playwright.config.ts), if you navigate to the “Retry 1” tab, scroll to the bottom of the page, and click on the image in the “Traces” section. You’ll be able to see every step that took place in the browser—really cool!!!
Conclusion
In my opinion, using BDD with Cucumber has to add a LOT of value to the business to justify its use (and I’ve never seen a case like that!). With so many extra files, so many limitations, and the fact that we’d be missing out on the countless advantages Playwright offers natively, it would be very difficult to convince me that using it is truly worthwhile. So my first recommendation is: DO NOT USE IT (keeping in mind, once again, that each case must be evaluated individually).
Comparing the files tests/example.spec.ts and bdd-tests/step-definition/example.step.ts, they have roughly the same number of lines—but more imports and more words. It’s more code to read, and more code to compile. All of this takes TIME. Time added to your work and to the team’s pipeline. And that’s without even considering the files bdd-tests/support/hooks.ts and bdd-tests/support/custom-world.ts, which also consist of lines of code and will also need to be read, updated, and compiled with some frequency.
However, using BDD without Cucumber to assist in writing tests—without using feature files—is a somewhat better alternative for certain project scenarios (as we saw in the section “Alternatives to BDD in Playwright—BDD without Cucumber”). It’s important to document how it should be used so that the code follows a clearly established standard and both creation and maintenance are straightforward.
I still believe that the code is much cleaner without using BDD—whether with or without Cucumber—and that creating and maintaining tests becomes much simpler.
Here are some questions for you and your team to discuss regarding the use of BDD in the project:
If the project is new:
- Is there any contractual requirement to use BDD and to deliver the source code to the client?
—If so, discuss with the project manager whether this clause can be changed. 🙂 - Is there any interaction with non-technical team members who need to validate the scenarios?
— If so, will the feature files be written by someone outside the development and testing team?
— If not, you don’t need feature files in your automated testing project. You can simply use the files to help with test implementation. No non-technical person will open your test suite to review the feature files.
— And even if they do, you still don’t need feature files in your project! - How long will this project last, and how large might the test suite become?
— As the project grows, if you use Cucumber, the number of files will double—and potentially the size of your project as well. Imagine new team members having to familiarize themselves with all those files. Imagine having to update at least two places (the feature file and the step definition) whenever you change a scenario. Imagine organizing tests with such long phrases as “the title has the text ‘Playwright’” to avoid duplication (compared to a possible function name like “checkPageTitle”). Imagine the time it takes to download, compile, and run the entire project in your pipeline. - What value will using BDD ACTUALLY add to this project?
- Are we willing to spend time (days, maybe weeks) manually reconfiguring everything that Playwright already natively offers us (cross-browser support, debugging, reports, parallelism, viewport, retries, tracing)?
If the project already has an implementation:
- What is the ratio of maintenance on existing code versus implementation of new code in the project?
—If the project requires virtually no maintenance, or very little, it would be worth considering discontinuing the use of BDD; the team doesn’t use it for new code anyway. We could consider a migration strategy to the new architecture, such as a few days of a hackathon to migrate all legacy code to the new architecture. Or, we could eventually accept having two different architectures within the same codebase. This is not a problem as long as there is good documentation and guidance on how to use the code.
—If the project consists almost entirely of maintenance, one could also evaluate the possibility of a migration project. To prove that this is a valid strategy, you can conduct a proof of concept (POC) by measuring the time it takes to modify a test (based on a requirement) and the time it takes to build the test without using BDD. Another strategy would be to use a hackathon to migrate the most complex files and leave the rest in a legacy project.
— Consider using artificial intelligence tools such as “ChatGPT” or “GitHub Copilot” to assist with the migration. You can ask these tools to generate code in a specific language based on existing code. - What value is the use of BDD ACTUALLY adding to this project?
Good discussion!
Additional References:
- Stefan Teixeira’s Talk on Playwright for the Minas Testing Conference 2022
- Playwright training courses by Renata Andrade
- Framework with all Cucumber configuration ready: playwright-bdd
- Playwright with BDD in JavaScript
- Cucumber Framework Documentation
- More robust and comprehensive implementation: https://github.com/Tallyb/cucumber-playwright/
- A very interesting read about BDD—its advantages, its history, and some fun facts.
